Django CRUD sample with Oracle
-
This page provides a complete tutorial on how to develop a python web application using Django Framework.
Basic CRUD operations are implemented. This sample uses Oracle as the database.
We will use cx_Oracle python library as interface for Oracle. Step by step process is explained in below. -
Contents
-
Python Initial Setup
Download and install the latest version of python from Python Website if not already done.
Keep your favourite Python editor ready. This can be a basic notepad application available by default for your OS or you can download and install any free editor like VS Code.
Setting up virtual environment is not a must, but its is good to keep all your projects within a virtual environment. Here, we will proceed with a virtual environment.
For that, go to the command prompt and cd to the folder where you are going to keep your project.
Run command python -m venv CarSalesVENV to create a project folder CarSales and a virtual environment for it.
Activate the VE using command:For Windows:CarSalesVENV\Scripts\activate.batFor Linux, macOS:source CarSalesVENV /bin/activateAfter VE activation, from cmd type cd CarSalesVENV to navigate to the project folder.
-
Install cx_Oracle
For Oracle connection we are going to use the cx_Oracle library. For quick reference on cx_Oracle click cx_Oracle basics.
Install this using the command:
pip install cx_Oracle -
To check if cx_Oracle installed successfully
Type pip freeze. If installation successful, we will get below output.
cx-Oracle==8.3.0
-
Install Django
To install Django, run command pip install django or pip3.9 install django (if we set up 3.9 VE).
Run pip freeze or pip3.9 freeze to check if Django installed successfully. Should give an output like this.
asgiref==3.4.1
cx-Oracle==8.3.0
Django==4.0
sqlparse==0.4.2
tzdata==2021.5
-
Web Application Initial Setup
A Django application is structured as a top level Django Project with zero or more Django Apps (modules) within it. Project will contain common codes specific to all sub apps.
For our example, we will create a project within our virtual environment and an app inside it. We will explain the initial setup in multiple steps.Step 1: Create Django Project
To create a project run:
django-admin startproject CarSalesProject .
Running the above command will create a project named CarSalesProject and a python file manage.py will get added. We are providing a ' .' after the project name to avoid an additional folder with the same name being created. See the folder structure after creating project.
Step 2: Create Django App
Now on, we don't have to use django-admin in our commands. Use the below command to create our CarSales app.
python manage.py startapp CarSales
A new app folder will get created with some files in it. For more details on the files created, you can refer Django Basics.
New folder structure below: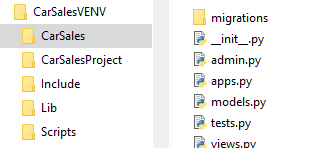
Step 3: Include app to our project
For this, in settings.py, add our new app CarSales (case sensitive) to INSTALLED_APPS list as below.

-
Loading First HTML Page
This part explains how we are going to define the routes and where to place our html files. We are going to work on four files highlighted in below image. An html file and 2 urls.py file and views.py file
Html files should be placed within a folder named templates. Create this folder in our CarSales app.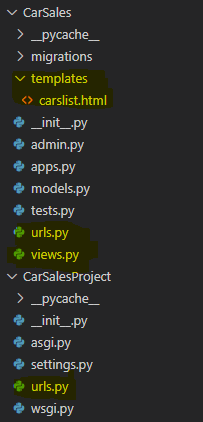
Add a new html file carslist.html, inside templates folder.
We should have 2 urls.py, one inside, project folder and one inside app folder. If not available, create these files. urls.py in project folder adds a reference to the app urls.py.
In app urls.py we define the urlpatterns for this module.
In views.py we define the htmls to render for each route. Code provided below.Run the app using command python manage.py runserver
Copy the url from cmd and browse. We should get below output window.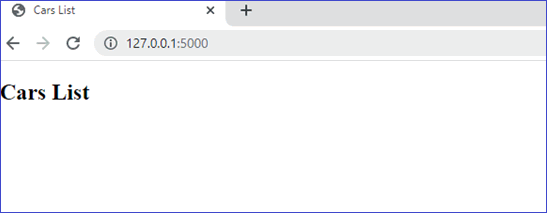
-
Oracle Database Setup
Connect to your Oracle database. Create a table TblCars with below structure and insert below set of data and commit.
CREATE TABLE TblCars (
    ID int,
    Name varchar(100),
    Year int,
    Price float
);
INSERT INTO TblCars VALUES (1, 'Toyota Camry', 2018, 2000); INSERT INTO TblCars VALUES (2, 'Honda Civic', 2019, 2200); INSERT INTO TblCars VALUES (3, 'Chevrolet Silverado', 2017, 1800); INSERT INTO TblCars VALUES (4, 'Ford F-150', 2020, 2500); INSERT INTO TblCars VALUES (5, 'Nissan Altima', 2021, 3000); commit;
-
Read data from Oracle database and list
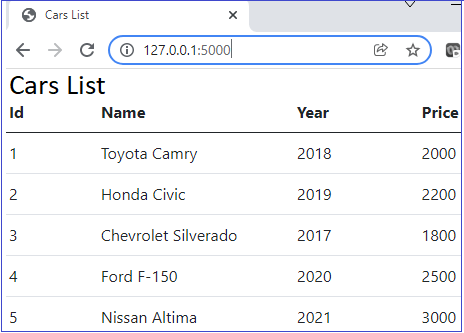
carslist.html is going to hold the list of cars available for sale. To list the items, add below code in the body of html. Here, we using a for loop to bind the data to a table.
Now modify views.py as below to read the data from Oracle database. Import cx_Oracle. Bind data to the html using render function.For styling we will use Bootstrap 5. Add below 2 lines inside head of html.
<link rel="stylesheet" crossorigin="anonymous"
href="https://cdn.jsdelivr.net/npm/bootstrap@5.0.2/dist/css/bootstrap.min.css" >

<script crossorigin="anonymous"
src="https://cdn.jsdelivr.net/npm/bootstrap@5.0.2/dist/js/bootstrap.bundle.min.js" >
</script>
On refreshing the web page, we will get the below output window.
-
Create new record
Add a new button in the carslist.html above the table.
<a class="btn btn-primary" href="addcar">Add New Car</a>Add a new url pattern for addcar in the app urls.py.
from django.urls import path
from . import views
urlpatterns = [
    path('', views.carslist, name = 'carslist'),
    path('addcar', views.addcar, name = 'addcar')
]
Add new html file addcar.html in templates folder and place below code.
Html uses forms. To handle forms in Django we need a form class. Add an new file forms.py in the CarSales app folder and include the form details.
Then add below code in view.py as the second function below carslist function.Also import the form class and redirect in view.py
from django.shortcuts import render, redirect
from django.apps import apps
import cx_Oracle

from .forms import CarForm
In the view.py, we are defining a new function for addcar. We are using the same method for GET and POST. GET is just rendering addcar.html. In POST, we are reading data from form controls and save data to Oracle table and then redirect to list page.
In HTML page, we are defining a form with 4 text boxes. Each has a name provided. This name is used in the view.py while reading data from controls.
In the HTML form, we have to add {% csrf_token %} next to form tag to avoid csrf verification failed error. On rerun, we can navigate to Create page as below and add new Car.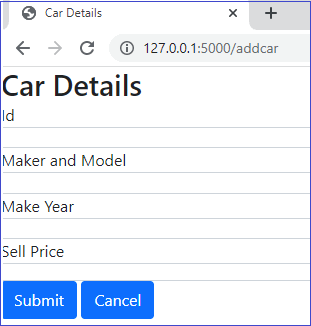
-
Update an existing record
For update and delete we will add 2 links in the carslist.html page as below.
Copied<table class="table"> <thead> <tr> <th scope="col">Id</th> <th scope="col">Name</th> <th scope="col">Year</th> <th scope="col">Price</th> <th scope="col">Edit</th> <th scope="col">Delete</th> </tr> </thead> <tbody> {% for car in cars %} <tr> <td>{{ car.id }}</th> <td>{{ car.name }}</td> <td>{{ car.year }}</td> <td>{{ car.price }}</td> <td><a href='updatecar/{{ car.id }}'>Edit</a></td> <td><a href='deletecar/{{ car.id }}'>Delete</a></td> </tr> {% endfor %} </tbody> </table>For easier understanding, we are going to keep separate routes for create and update, although we are using the same addcar.html for update also. For update we will provide the route name updatecar.
In addcar.html, in order to populate the values, we have to use the value attribute and bind the car object values as in html provided below.
In views.py, add new updatecar function. In GET, we are filtering details based on selected id and using fetchall() function, assigning it to a list variable and pass it to the addcar.html page.
In POST, we are using the update command and commit
Note: We have to disable Id textbox to not make changes to Id. Here we are not doing it and if Id is changed no update will happen.Also, add a new url pattern for updatecar in the app urls.py.
from django.urls import path
from . import views
urlpatterns = [
    path('', views.carslist, name = 'carslist'),
    path('addcar', views.addcar, name = 'addcar'),
    path('updatecar/<int:id>', views.updatecar, name = 'updatecar')
]
After the above changes, update will work, but create will throw an error. To fix this, change the render line of addcar as below.
return render(request, 'addcar.html', {'car':{}})We are binding an empty car object to make it working.
-
Delete a row
For delete, we will add a new route deletecar. And just need to provide delete query as below. If needed, a confirm popup also can be added.
Copieddef deletecar(request, id): conn = connection() cursor = conn.cursor() cursor.execute("DELETE FROM TblCars WHERE id = :crid", [id]) conn.commit() conn.close() return redirect('carslist')Then add new url pattern for deletecar in the app urls.py.
from django.urls import path from . import views urlpatterns = [ path('', views.carslist, name = 'carslist'), path('addcar', views.addcar, name = 'addcar'), path('updatecar/<int:id>', views.updatecar, name = 'updatecar'), path('deletecar/<int:id>', views.deletecar, name = 'deletecar') ] -
Django CRUD with Oracle - Complete code
Below listed are the files with code changes. Also a one line change required in Settings.py which is explained at the beginning.
-
Other web app samples
Crud Samples implemented using different frameworks and databases.
