Python web application sample using CherryPy
-
A web application sample that covers all the basics of CherryPy web app development through simple and easy steps. As you may know, CherryPy is one of the simplest and most used Python based web app development framework. CherryPy is proven to be fast and reliable and supports the latest version of Python.
This article uses a simple book library application to explain the CherryPy framework. Follow this topic step-by-step to quickly learn how to set up CherryPy for first time in your machine and initial steps to run a CherryPy web application.
Then we will go through basic CRUD actions for a CherryPy based web application. We will list a collection of items in a web page, provide an option to insert a new item or update an existing item and deleting an existing record as well. Data will be kept in JSON format in a separate file. For actual database samples, you can refer the links provided on the side bar.
Along with CherryPy library, we are going to use Jinja2 template engine as well, to render the HTML page and to bind data.
-
Install Python and setup Virtual Environment
Download and install the latest version of python from Python Website.
Setting up virtual environment is not a must, but its is good to keep all your projects within a virtual environment. Here, we will proceed with a virtual environment.
For that, go to the command prompt and cd to the folder where you are going to keep your project.
Run command python -m venv book_library to create a virtual environment folder book_library. We will be keeping all our code in this folder and the installed package files will also be kept automatically within this folder.
Now, activate the VE using command:For Windows:book_library\Scripts\activate.batFor Linux, macOS:source book_library /bin/activateAfter VE activation, from cmd type cd book_library to navigate to the project folder.
-
Install CherryPy and Jinja2
To install CherryPy, run command pip install CherryPy
Then install Jinja2 using the command pip install Jinja2
Jinja2 is basically a template engine that helps in serving the html to the user. Using this library along with CherryPy helps in faster development. For example, we are using Jinja2 function get_template to render HTML page from the python code and python codes like for loops are added to the HTML page using the Jinja2 template markup syntax.Run pip freeze to check if all packages installed successfully.
-
Initial steps for CherryPy Web App
Let us start with the initial set of code that is required for every CherryPy web applications. Create a file named books.py inside book_library folder and copy below code to it. books.py is going to contain the start-up code which is required to run the web app.
Now, from command prompt, navigate to book_library folder and execute command py books.py or python books.py or py -3.9 -m books or python3.9 -m books (Based on the Python version used and the Operating System).import cherrypy class BookLibrary(object): @cherrypy.expose def index(self): return 'Book Library app is starting up' if __name__ == '__main__': cherrypy.quickstart(BookLibrary())This code imports cherrypy module and then a startup class is created and initiated using the quickstart method from the __main__. Startup class should have a method named index that will load the first HTML content.
In command prompt, we will see the below message when execution starts without any issues.[08/Jun/2022:18:11:50] ENGINE Listening for SIGTERM. [08/Jun/2022:18:11:50] ENGINE Bus STARTING CherryPy Checker: The Application mounted at '' has an empty config. [08/Jun/2022:18:11:50] ENGINE Started monitor thread 'Autoreloader'. [08/Jun/2022:18:11:50] ENGINE Serving on http://127.0.0.1:8080 [08/Jun/2022:18:11:50] ENGINE Bus STARTED
Copy the URL http://127.0.0.1:8080 to your browser and run. The message Book Library app is starting up will display in the web browser, if the set up is proper and without any issues.
-
Setting up First page
Now we are going to load an HTML file as the first page of the application.
Create an HTML file bookslist.html inside book_library folder.Add below code to bookslist.html page.
In books.py, add the line return open('bookslist.html') inside index function to render this HTML as the first page.Changes are automatically compiled and on refreshing the web page we can see the HTML page as the output.
-
JSON Data Setup
This tutorial mainly focuses on CherryPy framework. So, we are not going for a back-end database and will keep the data in a JSON file. Create bookslist.json in the same folder and copy below content.
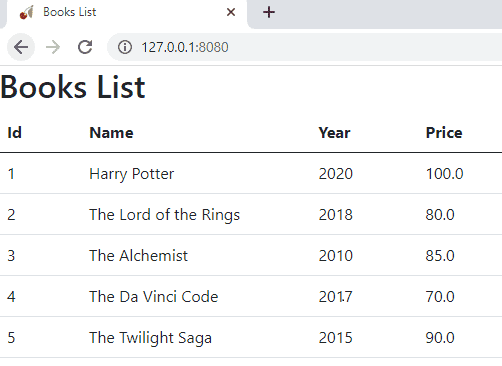
Copied[ {"id":"1", "name":"Harry Potter", "year":"2020", "price":"100"}, {"id":"2", "name":"The Lord of the Rings", "year":"2018", "price":"80"}, {"id":"3", "name":"The Alchemist", "year":"2010", "price":"85"}, {"id":"4", "name":"The Da Vinci Code", "year":"2017", "price":"70"}, {"id":"5", "name":"The Twilight Saga", "year":"2015", "price":"90"} ] -
List
bookslist.html is going to show the list of books in the library. Add below code to the body of the HTML and modify books.py main method as below.
In books.py, import json and mention the path to the JSON file. Then in index() method, read data from the JSON file and pass to the html file using the Jinja2 template function get_template(). We cannot use the open() method because we need to bind the list of items dynamically to the HTML page. So we are using get_template() function instead.For styling we will use Bootstrap 5. Add below 2 lines inside head of html.
    <link rel="stylesheet" crossorigin="anonymous"
	href="https://cdn.jsdelivr.net/npm/bootstrap@5.0.2/dist/css/bootstrap.min.css" >

	<script crossorigin="anonymous"
	src="https://cdn.jsdelivr.net/npm/bootstrap@5.0.2/dist/js/bootstrap.bundle.min.js" >
	</script>
On reload, we will get below output window.
-
Insert and update an item
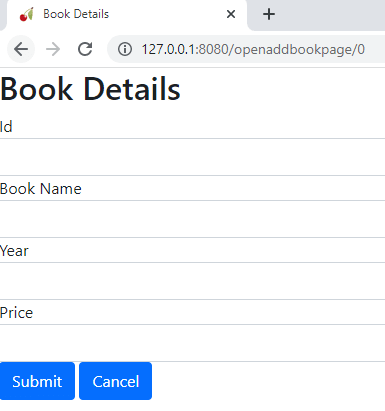
Add a new link button in the bookslist.html above the table.
<a class="btn btn-primary" href="openaddbookpage/0">Add New Book</a>Add new html file, addbook.html and place the below code.
Add two links for edit and delete in bookslist.html as below.
Add two more route methods, openaddbookpage() and savebookdetails() in books.py below index() method to handle routing to the edit page and saving the data (Double check the pasted contents are properly intended).Add New Book button in the list page calls openaddbookpage route with ID as 0. So Book Details page opens in Create mode with empty text boxes.
Edit link next to each row also calls openaddbookpage route, but passes ID number to the Book Details page. So the details of the selected book is fetched from the JSON file and bind to the corresponding text boxes in the HTML page.savebookdetails route is called on Submit button click. If the entered ID number doesn't exist, new book gets added. Otherwise, existing record is updated.
-
Delete an Item
For delete, we will add a new route method deletebook(). And then, loop through the list and remove selected item.
Copied@cherrypy.expose def deletebook(self, id=0): with open(jsnfile) as bk: books = json.load(bk) newlist = [] for book in books: if(book['id'] != id): newlist.append(book) with open(jsnfile, 'w') as bw: json.dump(newlist, bw) raise cherrypy.HTTPRedirect("../") -
CherryPy CRUD with JSON - Complete code
Complete code is placed below.
-
Other web app samples
Crud Samples implemented using different frameworks and databases.
