Firebase database CRUD sample with Django web app
-
The Firebase Realtime Database is a cloud-hosted database. Data is stored as JSON and synchronized in realtime to every connected client across different platforms. Firebase is a NoSQL database and persists data on the local storage, which enables Firebase based applications to work even when offline. The Firebase local database that persists in devices can be accessed directly from a mobile device or web browser. That means, using Firebase database we can develop web applications or mobile apps that will work on offline mode as well.
In this tutorial we will create a python based web application using Django framework. This is a simple application that lists a set of cars available in a showroom for sale. Users can add, edit or delete from this list. We will learn how to set up a Firebase database, connect to Firebase from a Django based python web application, perform basic Read, Create, Update and Delete (CRUD) operations on a Firebase DB. firebase_admin library is used as the adapter to interact to Firebase DB from python code.
-
Contents
-
Install Python and setup Virtual Environment
Download and install the latest version of python from Python Website if not already done.
Keep your favourite Python editor ready. This can be a basic notepad application available by default for your OS or you can download and install any free editor like VS Code.
Next step is to set up a virtual environment.
For that, go to the command prompt and cd to the folder where you are going to keep your project.
Run command python -m venv CarSalesVENV to create a project folder CarSales and a virtual environment for it.
Activate the VE using command:For Windows:CarSalesVENV\Scripts\activate.batFor Linux, macOS:source CarSalesVENV /bin/activateAfter VE activation, from cmd type cd CarSalesVENV to navigate to the project folder.
-
Install Django Framework and firebase-admin
To install Django, run command pip install django or pip3.9 install django (if we are using Python 3.9).
Similarly install firebase-admin using command pip install firebase-admin or pip3.9 install firebase-admin
Run pip freeze or pip3.9 freeze to check if Django and firebase-admin installed successfully.
-
Initial steps for Django Web Apps
A Django application is structured as a top level Django Project with zero or more Django Apps (modules) within it. Project will contain common codes specific to all sub apps.
For our example, we will create a project within our virtual environment and an app inside it. Let us go through the steps one by one.Step 1: Create Django Project
To create a project run:
django-admin startproject CarSalesProject .
Running the above command will create a project named CarSalesProject and a python file manage.py will get added. We are providing a ' .' after the project name to avoid an additional folder with the same name being created. See the folder structure after creating project.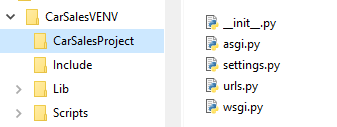
Step 2: Create Django App
Now on, we don't have to use django-admin in our commands. Use the below command to create our CarSales app.
python manage.py startapp CarSales
A new app folder will get created with some files in it. For more details on the files created, you can refer Django Basics.
New folder structure below: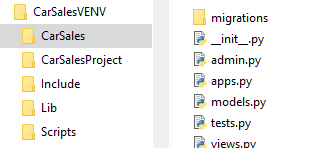
Step 3: Include app to our project
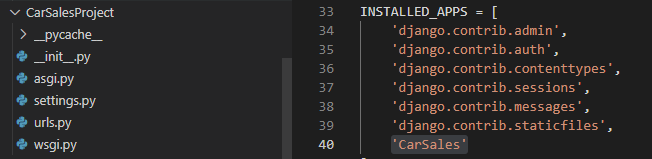
For this, in settings.py, add our new app CarSales (case sensitive) to INSTALLED_APPS list as below.
-
Loading First HTML Page
This part explains how we are going to define the routes and where to place our html files. We are going to work on four files highlighted in below image. An html file and 2 urls.py file and views.py file
Html files should be placed within a folder named templates. Create this folder in our CarSales app.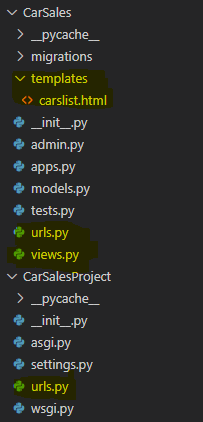
Add a new html file carslist.html, inside templates folder.
We should have 2 urls.py, one inside, project folder and one inside app folder. If not available, create these files. urls.py in project folder adds a reference to the app urls.py.
In app urls.py we define the urlpatterns for this module.
In views.py we define the htmls to render for each route. Code provided below.Run the app using command python manage.py runserver
Copy the url from cmd and browse. We should get below output window.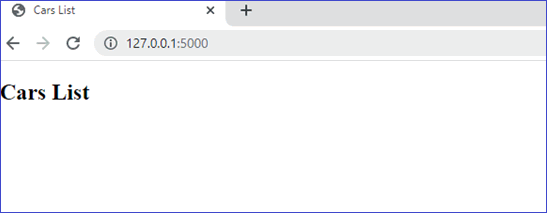
-
Firebase Database Initial Setup
To connect to a Firebase database, we have to configure Firebase project and database from the Firebase console and generate a private key configuration file.
If you are not familiar with the process, refer page Setting up Firebase database for the first time. -
Inserting initial set of data
Add a new file initialdata.py within the same virtual environment and paste the below code.
Copy the configuration file that we downloaded from the previous step to the virtual environment folder and rename it to carsales-admin-key.json. Also copy your database URL from Firebase console and paste it in the code.In the code, we are importing firebase_admin library and then connecting to the Firebase database using the private key configuration file. Then, we are declaring a new collection CarsList (this is similar to a table in SQL based databases) and inserting 5 records to this.
Execute the code using the command py initialdata.py
Copiedimport firebase_admin from firebase_admin import credentials from firebase_admin import db cred = credentials.Certificate("carsales-admin-key.json") firebase_admin.initialize_app(cred, { "databaseURL": "https://projectname-xxxxxxxxxxx-rtdb.firebaseio.com/" #Your database URL }) dbref = db.reference("CarsList") dbref.push( { "ID": 1, "Name": "Toyota Camry", "Year": 2018, "Price": 2000 } ) dbref.push( { "ID": 2, "Name": "Honda Civic", "Year": 2019, "Price": 2200 } ) dbref.push( { "ID": 3, "Name": "Chevrolet Silverado", "Year": 2017, "Price": 1800 } ) dbref.push( { "ID": 4, "Name": "Ford F-150", "Year": 2020, "Price": 2500 } ) dbref.push( { "ID": 5, "Name": "Nissan Altima", "Year": 2021, "Price": 3000 } ) print(dbref.get())dbref.get() fetches the inserted records from the collection. You can see that a unique key also got generated automatically for each inserted record. This key is required to identify records while update, delete, etc.
Copied{ '-N3w9V6DgdBXn3eYV4S2': {'ID': 1, 'Name': 'Toyota Camry', 'Price': 2000, 'Year': 2018}, '-N3w9VBcxfkrsSHZyLVZ': {'ID': 2, 'Name': 'Honda Civic', 'Price': 2200, 'Year': 2019}, '-N3w9VGh6kLhAkhO-mA9': {'ID': 3, 'Name': 'Chevrolet Silverado', 'Price': 1800, 'Year': 2017}, '-N3w9VLhw_EZmUJiwXTe': {'ID': 4, 'Name': 'Ford F-150', 'Price': 2500, 'Year': 2020}, '-N3w9VQw0aZtLbq-vFEC': {'ID': 5, 'Name': 'Nissan Altima', 'Price': 3000, 'Year': 2021} } -
Fetch data from Firebase DB and list
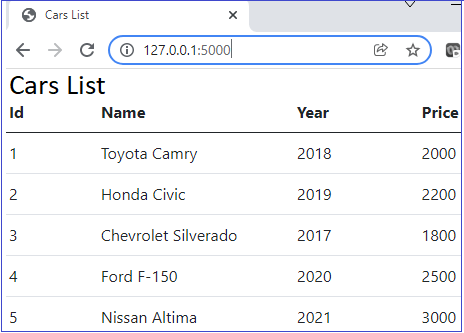
carslist.html is going to hold the list of cars available for sale. To list the items, add below code in the body of html. Here, we are using a for loop to bind the data to a table.
Now modify views.py as below to read the data from Firebase database. Here we are importing firebase-admin first and then establishing a connection to the Firebase DB. Note that the connection should be established only once. To check this, we are adding a line if not firebase_admin._apps: to the connectDB() method. Then fetch items using get() method and bind it to HTML using render().For styling we will use Bootstrap 5. Add below 2 lines inside head of html.
    <link rel="stylesheet" crossorigin="anonymous"
	href="https://cdn.jsdelivr.net/npm/bootstrap@5.0.2/dist/css/bootstrap.min.css" >

	<script crossorigin="anonymous"
	src="https://cdn.jsdelivr.net/npm/bootstrap@5.0.2/dist/js/bootstrap.bundle.min.js" >
	</script>
On refreshing the web page, we will get the below output window.
-
Insert new item to Firebase DB
Add a new button in the carslist.html above the table.
<a class="btn btn-primary" href="addcar">Add New Car</a>Add a new url pattern for addcar in the app urls.py.
from django.urls import path
from . import views
urlpatterns = [
    path('', views.carslist, name = 'carslist'),
    path('addcar', views.addcar, name = 'addcar')
]
Add new html file addcar.html in templates folder and place below code.
Html uses forms. To handle forms in Django we need a form class. Add an new file forms.py in the CarSales app folder and include the form details.
Then add below code in view.py as the second function below carslist function.Also import the form class and redirect in view.py
from django.shortcuts import render, redirect
from django.apps import apps
import firebase_admin
from firebase_admin import credentials
from firebase_admin import db

from .forms import CarForm
In the view.py, we are defining a new function for addcar. We are using the same method for GET and POST. GET is just rendering addcar.html. In POST, we are reading data from form controls and save data to table using push() method and then redirect to list page.
In HTML page, we are defining a form with 4 text boxes. Each has a name provided. This name is used in the view.py while reading data from controls.
In the HTML form, we have to add {% csrf_token %} next to form tag to avoid csrf verification failed error. On rerun, we can navigate to Create page as below and add new Car.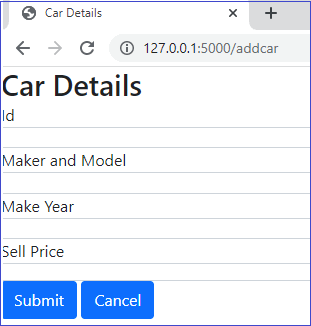
-
Update items - Firebase DB
For update and delete we will add 2 links in the carslist.html page as below.
Copied<table class="table"> <thead> <tr> <th scope="col">Id</th> <th scope="col">Name</th> <th scope="col">Year</th> <th scope="col">Price</th> <th scope="col">Edit</th> <th scope="col">Delete</th> </tr> </thead> <tbody> {% for car in cars %} <tr> <td>{{ car.id }}</th> <td>{{ car.name }}</td> <td>{{ car.year }}</td> <td>{{ car.price }}</td> <td><a href='updatecar/{{ car.id }}'>Edit</a></td> <td><a href='deletecar/{{ car.id }}'>Delete</a></td> </tr> {% endfor %} </tbody> </table>For easier understanding, we are going to keep separate routes for create and update. For update, we will provide the route name updatecar.
In addcar.html, in order to populate the values, we have to use the value attribute and bind the car object values as in html provided below.
Then, in views.py, add new updatecar function.
To update a record, we need the unique key value that was automatically generated at the time of insert. To get this, we are looping through the records and using the selected ID, we are retrieving and storing the key at the time of page load (GET). Then in POST, call the update() method to modify the selected item.
Note: Disable the ID textbox to not make changes to ID. Here we are not doing it and if ID is changed no update will happen.Also, add a new url pattern for updatecar in the app urls.py.
from django.urls import path
from . import views
urlpatterns = [
    path('', views.carslist, name = 'carslist'),
    path('addcar', views.addcar, name = 'addcar'),
    path('updatecar/<int:id>', views.updatecar, name = 'updatecar')
]
After the above changes, update will work, but create will throw an error. To fix this, change the render line of addcar as below.
return render(request, 'addcar.html', {'car':{}})We are binding an empty car object to make it working.
-
Delete an Item from Firebase DB
For delete, add a new route deletecar get the unique key and call delete() method as below.
Copieddef deletecar(request, id): dbconn = connectDB() tblCars = dbconn.get() for key, value in tblCars.items(): if(value["ID"] == id): deletekey = key break delitem = dbconn.child(deletekey) delitem.delete() return redirect('carslist')Then add new url pattern for deletecar in the app urls.py.
from django.urls import path from . import views urlpatterns = [ path('', views.carslist, name = 'carslist'), path('addcar', views.addcar, name = 'addcar'), path('updatecar/<int:id>', views.updatecar, name = 'updatecar'), path('deletecar/<int:id>', views.deletecar, name = 'deletecar') ] -
Django CRUD with Firebase database - Complete code
Below listed are the files with code changes. Also a one line change required in Settings.py which is explained at the beginning.
-
Other web app samples
Crud Samples implemented using different frameworks and databases.
