Tkinter Tutorial
-
This article is designed as a quick tutorial with working sample codes to cover the basics of Tkinter GUI library. Tkinter one of the most popular and free to use python libraries to develop GUI applications for different types of operating systems.
Tkinter stands for Tk Interface. Tk is a toolkit that is open source and cross platform that helps in building GUIs in multiple languages including Python. Tkinter is built as a python wrapper for TK, which essentially provides all TK functionalities in Python. Tkinter can be used to create desktop applications that can run on Windows, Mac, Linux, etc.
Tkinter has several built-in widgets(controls and layouts) that can be used to develop input/output based desktop applications or interactive games that require animations.
We will go through the basics of Tkinter in subsequent sections with working examples. Also try out the sample applications provided at the end of this section to get a better understanding. -
Contents
-
Tkinter Installation
Download and install the latest version of python from Python Website if not already done.
Set up virtual environment.
If not already available, install TKinter using command pip install tk. If you get an error 'No module named pip', refer virtual environment setup section.
-
To check if Tkinter installed successfully
In command prompt type:
pip freezeIf installed successfully, latest version is listed as below:
tk==0.1.0 -
Basic Tkinter Application
Code provided in the below sample is the bare minimum for creating a Tkinter application.
First 2 lines import Tkinter module.
An object variable has to be declared of the class Tk as: varName = tk.Tk().
Place the last line varName.mainloop()(). This code will create an empty GUI window. We can place all our code between these 2 lines.Copiedfrom tkinter import * import tkinter as tk root = tk.Tk() #All code should go here root.mainloop()
To run the code, copy this to a .py file and type py filename.py or python filename.py in command prompt.
-
Tkinter window and its properties
All Tkinter programs should have a root level window, where we place all our widgets. We can easily change the window properties. Some samples below:
Window titleroot.title("First Tkinter App")Window sizeroot.geometry("300x200")Background colorroot.configure(bg='black') or root ['bg'] = 'purple'Min and max sizeroot.minsize(200,100)
root.maxsize(500,500Event binding on window closeroot.protocol("WM_DELETE_WINDOW", callback)Transparencyroot.attributes("-alpha", 0.5)Set window to full screenroot.attributes("-fullscreen", 1)Stop window from resizingroot.resizable(FALSE,FALSE) -
Configure
Configure method can be used to assign values to different properties of widgets and window. In below example, background color of window is changed and background and foreground color of label is changed.
Copiedfrom tkinter import * import tkinter as tk root = tk.Tk() root.title("First Tkinter App") root.geometry("300x200") root.configure(bg='black') lbl = Label(text="This is a new label") lbl.pack() root.configure(bg='purple') lbl.configure(fg='white', bg='red') root.mainloop()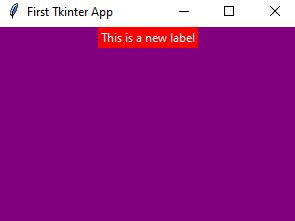
-
Pack Method
Pack method is required to place a widget into window. It is required to pack all of our widgets. Other wise it will not be displayed. Options are there to align to top, bottom, left or right or to a particular row/column if frames are used.
See example below.Copiedfrom tkinter import * import tkinter as tk root = tk.Tk() root.title("First Tkinter App") root.geometry("300x200") root.configure(bg='black') lbl1 = Label(text="Top label") lbl1.pack() lbl2 = Label(text="Right label") lbl2.pack(side=RIGHT) lbl3 = Label(text="Left label") lbl3.pack(side=LEFT) lbl4 = Label(text="Bottom label") lbl4.pack(side=BOTTOM) root.mainloop()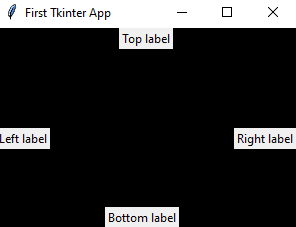
-
Binding Events
Bind method is used to bind a function to an event.
Syntax is: widget.bind(event, function, +)Third parameter is optional. If multiple functions are bind to same event, use +.
We will go through different types of bindings to understand better.
Below code has a button, label and textbox. We can try different bind options with this example.
Copiedfrom tkinter import * import tkinter as tk root = tk.Tk() root.title("First Tkinter App") root.geometry("300x200") root.configure(bg='black') def func(fstPrm): print("Event triggered" + str(fstPrm)) return lbl = Label(text="This is a new label") lbl.pack() txt = Entry(text="Sample Text") txt.pack() btn = tk.Button(text ="Click Me") btn.pack(side = BOTTOM) #Try any of the below samples to check #root.bind('<Return>', func) #txt.bind('<Return>', func) #btn.bind('<Return>', func) #lbl.bind('<Return>', func) #btn.bind('<KeyPress>', func) #btn.bind('<Alt-KeyPress>', func) #btn.bind('<Button>', func) #btn.bind('<ButtonRelease>', func) #btn.bind('<Enter>', func) #btn.bind('<Leave>', func) #btn.bind('<FocusIn>', func) #btn.bind('<FocusOut>', func) #btn.bind('<Motion>', func) root.mainloop()Bind Action Triggered when root.bind( '<Return>', func) Enter key pressed with focus anywhere in window. txt.bind( '<Return>', func) Enter pressed with focus on Entry (textbox). btn.bind( '<Return>', func) Enter key pressed with focus on button lbl.bind( '<Return>', func) This will not be triggered as we cannot place focus on label. btn.bind( '<KeyPress>', func) Same as Return. But triggered on pressing any key. btn.bind( '<Alt-KeyPress>', func) Any key pressed together with alt key (We can do the same for Ctrl, Shift). btn.bind( '<Button>', func) Mouse clicked on button. btn.bind( '<ButtonRelease >', func) Mouse click released from button. btn.bind( '<Enter>', func) Mouse pointer moved to widget. Such events works on label also (Widgets that cannot be focused). btn.bind( '<Leave>', func) Mouse pointer moved out of widget. btn.bind( '<FocusIn>', func) Focus placed on widget. btn.bind( '<FocusOut>', func) Focus moves away from widget. btn.bind( '<Motion>', func) Mouse pointer moves above control. Triggered continuously as mouse moves. -
Command Callbacks
Another way to bind event to a widget is using command callbacks. Callback function is directly placed at the time of creating using command keyword. This method is not that flexible and not all events can be bind using this technique.
See example below.Copiedfrom tkinter import * import tkinter as tk root = tk.Tk() def eventTriggerFunc(*args): print("Event triggered") return btn = tk.Button(text ="Click Me", command=eventTriggerFunc) btn.pack() root.mainloop() -
Widgets
Widgets are the components that we see inside our main window., Button, entry(textbox), label, frame, scrollbar, etc are some of the widgets provided by Tkinter. Widgets can be placed within a window, or we can create a frame widget and add other widgets into this.
Widget objects maintain a hierarchical order. Eg: Root – Frame – (Label, Button, etc).
We will go through some of the most important widgets below. -
Frames
Frames can be used to arrange other widgets within the window. A frame can contain another frame also. Example below creates a frame, sets size, borders, padding and adds 2 widgets inside.
Copiedfrom tkinter import * import tkinter as tk root = tk.Tk() root.title("First Tkinter App") root.geometry("300x200") root.configure(bg='black') fr = tk.Frame(root, width=200, height=200) fr['borderwidth'] = 2 fr['background'] = 'red' fr['relief'] = 'sunken' btn = tk.Button(fr, text ="Click Me", width=100, height=5) btn.pack() lbl = tk.Label(fr, text ="New Label", width=100, height=15, bg='green') lbl.pack() fr.pack(side=LEFT) root.mainloop()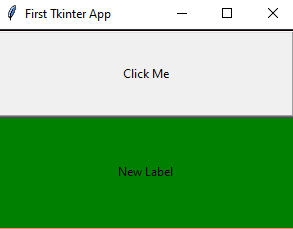
-
Label
Label can display text or image. Created as below.
    lbl = tk.Label(fr, text ="New Label", width=100, height=15, bg='green')
    lbl.pack()
To add image to a label, use below code.
lbl = tk.Label(fr) img = PhotoImage(file='imgname.png') lbl['image'] = img lbl.pack() -
Button
Below is a button sample. Events can be bind using event callback or event bindings explained above. Button can also hold an image, same like label.
Copiedfrom tkinter import * import tkinter as tk root = tk.Tk() root.title("First Tkinter App") root.geometry("300x200") root.configure(bg='black') def func1(): print('Button 1 clicked') return def func2(event): print('Button 2 clicked') return btn1 = Button(text='Button 1', command=func1) btn2 = Button(text='Button 2') btn2.bind('<Butto>', func2) btn1.pack() btn2.pack() root.mainloop() -
Entry
Entry is a text box field where users can input values. Events like KeyPress can be bind.
    def func2(event):
        print('Text changed')
        return

    txtVar = StringVar()
    txt = Entry(textvariable=txtVar)
    txt.bind('<KeyPress>', func2)
    txt.pack()
To dynamically insert a text we have to first clear it using delete and then insert as below.
txt.delete(0, END) txt.insert(0, "New Text") -
CheckButton
To get the checkbutton value, we need to use a variable. Sample provided below:
def func1(): print('Check changed', chkVar.get()) return chkVar = StringVar() chk = Checkbutton(text='Check 1', command=func1, variable=chkVar) chk.pack() -
RadioButton
Same variable to be used for a radio button group.
def func1(): print('Check changed', rdVar.get()) return rdVar = StringVar() rdVar.set('2')#Selects send radio by default rd1 = tk.Radiobutton(text='Radio 1', variable=rdVar, value='1', command=func1) rd2 = tk.Radiobutton(text='Radio 2', variable=rdVar, value='2', command=func1) rd1.pack() rd2.pack() -
ComboBox
To display a list of items. Can select, add, remove items. To bind listbox selection event, we have to use <<ListboxSelect>> as in example below:
Copiedfrom tkinter import * import tkinter as tk root = tk.Tk() root.title("First Tkinter App") root.geometry("300x200") root.configure(bg='black') def func1(csel): print('Selected item is', csel) return options = ["Item 1", "Item 2", "Item 3"] lvar = StringVar(value=options) l = Listbox(height=10, listvariable=lvar) l.pack() options.append("Item 4") lvar.set(options) l.bind("<<ListboxSelect>>", lambda e: func1(l.curselection())) root.mainloop()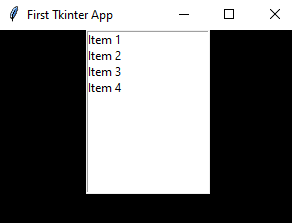
-
Grid Geometry Manager
Learning how to align widgets within a window is important. In Tkinter we have an option named grid() to align controls as rows and columns. We can create grid for a window or frame. We can create controls that can span multiple rows or columns also. In Tkinter grid we are not initially specifying how many columns or rows are there.
We will try to understand the concept with the below example.
Here we have created a root window and added a frame f as the first cell of the window using below code.f.grid(column=0, row=0, sticky=(N, S, E, W))We are going to add all our controls to this frame.In first row of the grid, we added a label and text box. Second row has a label that spans 3 columns. Then we have placed a button at the 4th column that spans 3 rows.
Sticky
When a widget is placed within a cell of a grid and if the size of the widget is less than the size of the cell, widget will get placed at the center of the cell. If we want to stretch the widgets to fit the cell, we can use sticky attribute. N, S, E, W are directions. We can also use values like SE (Bottom Right) to place it in corners.
Resizing Tkinter Window
When we resize a window, the widgets which are placed within will not stretch. If we want to stretch the rows and columns in a grid, we have to apply weight property to each row and column using rowconfigure and columnconfigure. Weight values can be used to determine how much percentage of stretch is needed on resizing window.
We have to use, weight property along with sticky property to make sure that cells as well as widgets are realigned upon resize. If sticky is not used, size of widgets will not change when we resize.
Copiedfrom tkinter import * import tkinter as tk root = Tk() f = tk.Frame(root) f['background'] = 'red' lbl1 = tk.Label(f, text="Label without span") txt1 = tk.Entry(f) lbl2 = tk.Label(f, text="Label spanning 3 columns", width=80) btn = tk.Button(f, text="Button\nspanning\n3 rows", height=10) f.grid(column=0, row=0, sticky=(N, S, E, W)) lbl1.grid(column=0, row=1, sticky=(N, S, E, W)) lbl1['background'] = 'green' txt1.grid(column=1, row=1, sticky=(N, S, E, W)) txt1['background'] = 'grey' txt1.insert(0, "Entry without span") lbl2.grid(column=0, row=2, columnspan=3, sticky=(N, S, E, W)) lbl2['background'] = 'blue' btn.grid(column=3, row=1, rowspan=3, sticky=(N, S, E, W)) btn['background'] = 'yellow' lbl1.config(font=("Times", 20)) txt1.config(font=("Times", 20)) lbl2.config(font=("Times", 20)) btn.config(font=("Times", 15)) btn.config(width=30) root.columnconfigure(0, weight=1) root.rowconfigure(0, weight=1) f.columnconfigure(0, weight=1) f.columnconfigure(1, weight=1) f.columnconfigure(2, weight=1) f.columnconfigure(3, weight=1) f.rowconfigure(0, weight=1) f.rowconfigure(1, weight=1) f.rowconfigure(2, weight=1) f.rowconfigure(3, weight=1) root.mainloop()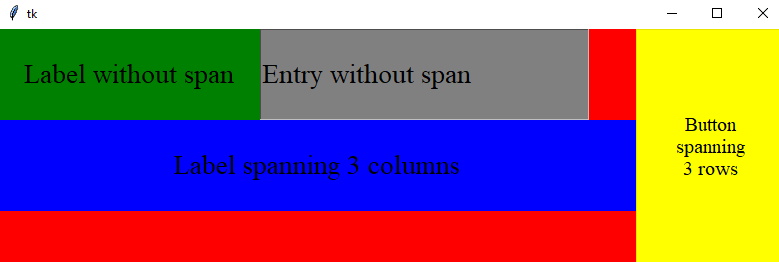
-
Canvas
Canvas is a frame where we can draw different shapes and animations. Below example creates a canvas window of size 400*500 and draws a line, rectangle, oval and polygon. Below example creates a canvas window of size 400*500 and draws a line, rectangle, oval and polygon. Also shows how to write a text and place an image within canvas.
We can also place widgets within canvas. Here we have placed a button widget.
We also have the option to bind events to the shapes that we have created. In the below example, a rectangle is created and bind an event using tag_bind method. On clicking the rectangle, its color changes from black to blue. Similarly we can do any type of animations that we want using event binding.Copiedfrom tkinter import * import tkinter as tk root = Tk() root.minsize(400,500) def changeColor(event): print ("clicked at", event) c.itemconfigure(rect, fill="blue") c = Canvas(width=400, height=500, background='#a0aa00') c.pack() c.create_line(25, 30, 250, 30, fill='blue', width=2) c.create_rectangle(25, 50, 250, 100, fill='blue', width=5) c.create_oval(25, 125, 250, 150, fill='blue', outline='red') c.create_polygon(25, 175, 200, 250, 125, 300, fill='blue') c.create_text(25, 300, text='New Text', anchor='nw', font='TkMenuFont', fill='blue') b = tk.Button(c, text='New Button') c.create_window(25, 350, anchor='nw', window=b) rect = c.create_rectangle(25, 400, 250, 450, fill='black', width=5) c.tag_bind(rect, "<Button-1>", changeColor) #img = PhotoImage(file='imgname.png') #c.create_image(10, 10, image=mimgyimg, anchor='nw') root.mainloop()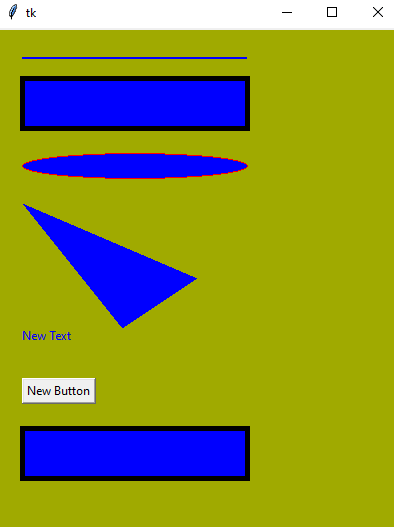
-
Tkinter Samples
