Kivy - KV Language Basics
-
Kivy KV Language is a separate markup that kivy understands, just like keeping separate css files for styles. KV language provides us the option to keep all the designs in a separate file with .kv extension. This is in a way similar to .css files. But the difference is that while css files provides only styling, .kv files can contain entire design components.
We should give proper indentation for kv language to work (same as python). To load kv language, we need to import Builder. Builder loads, KV as a string from a file or can be defined within the same file.kivy.lang import Builder
In this tutorial, we will go through the basics of KV Language and understand how to use it for actual scenarios.
-
Contents
-
Writing kv language strings within the same python file
We have to use the built-in load_string function. Below example creates a label using KV language. This is defined within the same python file.
Copiedfrom kivy.app import App from kivy.uix.label import Label from kivy.core.window import Window from kivy.lang import Builder lblKVLang = Builder.load_string(""" Label: text: 'KV Lang Style from string' font_size: '25' color: '#0000ff' """) class KVLangTestApp(App): def build(self): Window.clearcolor = (.5, 1, .2, 1) Window.size = (300, 300) return lblKVLang if __name__ == '__main__': KVLangTestApp().run()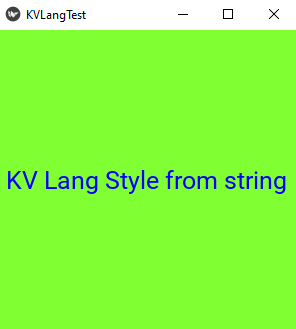
-
Writing KV language strings in a separate .kv file
We have to use the built-in load_file function. Create 2 files named kvLanguageTest.py and kvlangtest.kv and write below content inside and run to see the output.
-
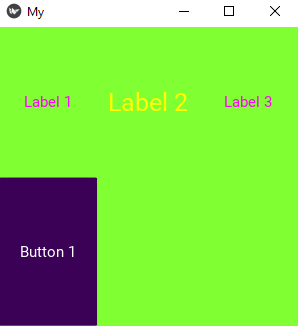
Defining contents inside a class using KV language
KV Language has provision to define the entire contents of a class widget.
Below example defines a class NewClass. We are going to set the contents of the class using kv language. To define a class, use the syntax <NewClass>. Note that, this class defined in python code should inherit Widget module.
Then provide the widgets required as shown in below code samples. Run it to get the below output screen.
-
Create some widgets from KV language and some using markups or attributes
In below example, one of the labels is defined from KV language. Rest is defined within the code.
See the code sample and output below:Copiedimport kivy kivy.require('2.0.0') from kivy.app import App from kivy.uix.label import Label from kivy.uix.gridlayout import GridLayout from kivy.core.window import Window from kivy.lang import Builder lblKVLang = Builder.load_string(""" Label: text: 'KV Lang Style' font_size: '25' color: '#00f2f3' """) class TestApp(App): def build(self): lblM = Label(text='[b][color=#ff00ff]Markup Style[/color][/b]', markup = True) lblA = Label(text="Attribute Style", color =(0, 0, .5, 1), font_size ="15sp", size_hint=(1.0, 1.0)) lblK = Label() layout = GridLayout(cols=1) layout.add_widget(lblM) layout.add_widget(lblA) layout.add_widget(lblKVLang) return layout if __name__ == '__main__': TestApp().run()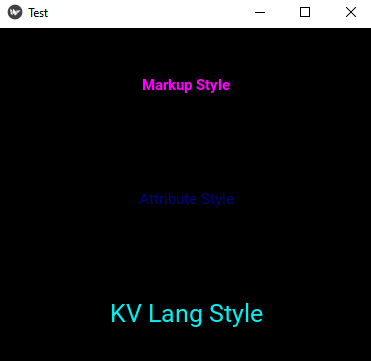
-
Define entire layout using KV language
Here we are defining a grid with 3 columns. 4 widgets added to it. Entire layout is then loaded to a string and returned from the build function.
-
Import a python module in KV language File
We can import required python modules inside KV language using syntax:
#:import name x.y.z
#:import App kivy.app
This is equivalent to Python code:
from x.y import z as name
from kivy.app import App
-
Set global variable in KV language File
In python we do like:
g = 100
In kv language this should be:
#:set g 100
Note that we have to use #: to do this same as import.
-
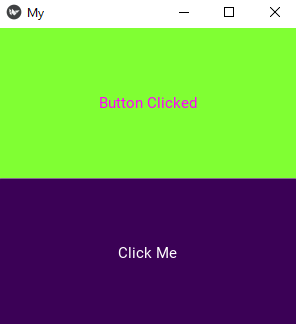
Binding an event in KV language
We have the option to bind event functions to different widgets from KV language. In below example we are defining an event on_press of a button, which calls a function buttonClick().
On clicking the button we will get the below output:
Button Clicked -
App, root and self in KV language
App, root and self are very important and is used to access the objects within the window and its properties and functions.
appRefers to the top instance. In below example it is MyApp. We can access all the functions within MyApp using app.rootRefers to the base widget. In below example, for button, root is GridLayout.selfRefers to the current widget. For this example it is button.Please refer the below sample:
On clicking the button we will get the below output:
App instance is <__main__.MyApp object at 0x000002981F168190>
Root instance is <kivy.uix.gridlayout.GridLayout object at 0x000002981F13DC80>. It has 2 columns.
Self instance is <kivy.uix.button.Button object at 0x000002981F13DDD0>. Its text is 'Click Me'. -
KV language – Using id to access a widget
We can provide an id to a widget and access it using this id. In below example, we have a label with id lblR. We are passing that object reference to buttonClick() using the id. We can use this id to access all the features of that particular control. Here we are changing the text of Label on button click.
-
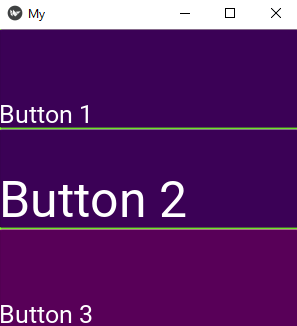
Grouping common properties of widgets in KV language
We have the option to keep common features together to avoid repeating it again. Here we have 3 buttons with some common features. We can apply common features as below. Common properties can also be overridden as in this example.